Search This Blog

Showing posts with label tomatoes. Show all posts

Tuesday, November 5, 2013

Home Made Hot Sauce

I love to garden.  Period.  Yet, it is one thing to love a tender plant until it produces it's fruit, and it's an entirely different thing to know what to do with the produce.  I learned that the hard way!  Years ago I planted WAY more than my family could ever eat, and more than my poor neighbors wanted. So, if you want to garden have a plan and the time to prepare what you grow.  Over the years, I have learned what my family loves the most is home made salsa.  I mean, THIS IS TEXAS! We love our hot sauce, hot wings, hot chili and our Tex-Mex food.  My family is no exception.  

This is the amount of hot sauce we will eat until next summer's canning begins!  (the darker is still hot sauce but it is in blue jars) I have a few peach and apple butters left from the summer, but it is mostly HOT SAUCE.  I canned about 75 jars and have given some away, but most of it is in the pantry highly guarded by my boys!  So let's get started on the recipe....You won't see me using "cups", so don't freak out because you cannot mess this up.

Here is what you will need:  5 large and fresh tomatoes or the equivalent of 5 large, 2 bunches of green onions in the bag (you will use the tops and the bottoms), 2 cans of rotel, 2 - 15oz cans of tomato sauce, 5-15 jalapeno peppers based on how hot you want your salsa, 2 T vinegar, 1 T sugar, 1 1/2 t garlic powder, 1 t salt, 1/2 lime, 2 large garlic cloves, and feel free to make it "your own" by adding any spices you like (season salt, paprika, cinlatro ect) This recipe will make about 4-5 pints

Chop ALL your veggies and peppers into BIG chunks because later you are going to put everything in the blender anyway.  I use 5 peppers for a mild sauce, 10 for a medium/hot and 15 for a hot hot sauce! (I use my roasting pan to put everything in before blending because it is the perfect size.)

 
Add ALL the ingredients listed, slightly chopped in the pan. Mix just a little before blending in the blender. (Be sure you use the tops and bottoms of the green onions, it is a MUST)

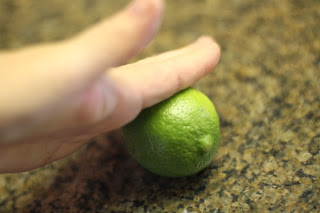
When limes are our of season, you can place them in the microwave for about 15 seconds and then roll before slicing.  The heat make it juicier.  But if you find you don't have much juice still, add ALL of the lime instead of half.

This picture shows it all together and below is what it looks like blended. 

So when I say blend it, I MEAN BLEND IT!  Liquify that salsa!  Go girl go

When all of the salsa is blended, add it to a big stock pot and cook on a medium low heat until it has cooked down a little.  Stir occasionally and do not cover.  I leave it on the cook top for about 45 minutes.  Sometimes less and sometimes more.  Place it in your well washed ball jars and then in the refrigerator unless you 'can' it.  The salsa should last in the fridge about 4 months. 


There is no sarcasm note today, because this Texas Hot Sauce deserves only respect and adoration!  


Saturday, August 31, 2013

Stuffed Zucchini (Yes Zucchini)

I know, here goes Lisa with more zucchini recipes!  At least I'm not standing at your door with a paper sack full of them, begging you once again to take it off my hands. Stuffed zucchini (or squash) can stand alone with a nice salad and bread.  (gluten free bread I hope) This recipe is great for those days you don't want to pick the garden and you leave the normal sized zucchini out there too long and they become Biblical in size.

 Here is what you will need: 
2 LARGE zucchini, 1 lb hamburger meat, 2 cloves garlic, salt and pepper to taste, 3 Tablespoons sandwich spread, 1/2 cups red and green bell pepper, 3 green onions, 1 1/4 cup mozzarella cheese, preheat oven to 350

Cut out the inside of your zucchini or squash, not much, just the seeded areas.  Discard or save it.  (I throw it out because I have an abundance of it)

Brown and drain your meat, add your remaining vegetables and salt and pepper to taste

Some stuffed zucchini recipes call for pesto but this is easier to find and just as good. Add 3 Tablespoons to mixture and if you desire more just know it will hurt my feelings that you strayed from my instructions.

Place foil in the bottom of a pan and put your hulled out veggies on top.  Now fill your zucchini, or squash, with the cooked mixture and top with cheese. Add 1/2 cup of water in the bottom of the pan and cover with foil.  Place in a preheated oven for 20-30 minutes.  The water will help steam the vegetables and keep the cheese from browning. 


Tuesday, March 19, 2013

Gluten Free Corn and Tomato Pie

 This is such a great dish for a brunch, or a side dish for a grilled meat.  You will not need bread because it's a PIE!  Crazy... I know.  I did not use the pre-made crust, I made Namaste's gluten free Piecrust.  Their regular recipe either makes 1 deep dish with a thick crust, or 2 regular pies with a thinner crust.  I made two pies as they seem to cook better throughout and you can add different ingredients to each based on your taste.
Here is what you will need:  pie crust, or crusts of your choice.  5 ears of corn cut from the cob, 2 large tomatoes, 1 cup shredded cheddar, 1/2 cup parmesan,  3 Tablespoons olive oil, 3 green onions, 1 seeded jalapeno pepper, 2 cloves garlic, 1/4 cup milk, 3/4 cup heavy cream, 3 eggs, salt and pepper to taste.  If you want to have a different cheese topping for one pie like I did, you can!  I used 5 slices of jalapeno jack for the topping of one pie & parmesan for the other.
Shuck your corn, wash and then cut it from the cob and place in a bowl.
 
Make your pie shells and bake them at directed temperature until ALMOST brown.  Like I said, I used GF and when working with a GF baking/pie mix keep your fingers moist to shape as these crusts can be dry.
While your crusts are in the oven, chop your green onions, seed and chop your jalapeno, and mince your garlic.  Place in a pan on a medium heat with your 3 Tablespoons of olive oil.


You will cook your onion, garlic and pepper for about 5 minutes and then add 1/4 cup water and your corn to the pan.  Stir & cover. You will saute this corn mixture for about 10 minutes.  (You don't want to cook the corn too long or on too high a heat)  While this is cooking, whisk your milk, eggs, and cream in a bowl.  Set aside.
Remove corn mixture from the pan, and drain.  Salt and pepper to taste while warm, then toss. 
Slice your tomatoes.  Preheat oven to 375 degrees.
Take the pie crusts and begin to layer:  1 cup corn, cheddar, 1 cup corn, top with tomatoes, then your last cheese.  (Parmesan or cheese of choice, I used Parm & Jalapeno Jack)
 
 
Pour your cream mixture over the top and bake at 375 degrees for about 20-25 minutes or until your center is firm.  I turn the oven off at 20 minutes and let them set in the oven.  (but your oven may be hotter or just different...so keep an eye on them if you do this)
Here is the final product.  Wait to serve until pies have cooled for about 30 minutes.  They will still be warm but not runny in the center.  


 **Sarcasm Note- I'm not certain how these GF crusts are going to turn out, they may be a catastrophic sucess....Your guess is as good as mine!

Sunday, March 10, 2013

Gluten Free Creamy Tomato Soup (crock pot all day!)


This soup is really good for a cold winter day with a grilled cheese, or cute to take to a neighbor with some basil flat bread, or just a quick lunch warmed in the microwave.  It's not JUST tomatoes but also has other veggies for greater health benefits.  Let's get started!

This crisp bread is NOT gluten free, but I really like the glutino vegetable crackers for G free.
Here is what you need:  2 - 14 oz diced tomatoes, 1 cup diced celery, 1 cup diced carrots, 1 cup diced onion, 1 tsp oregano, 4 cups chicken broth, 1/2 cup gluten free all purpose flour (or regular if you are not going GF), 1/2 cup Parmesan, 1/4 cup butter, 1 pint half and half, 1 tsp salt, 
and pepper to taste

First dice up your carrots, onions, celery.  Put it all in your crock pot with the canned tomatoes and oregano; then put your temp on medium for 4-6 hours.  It will not hurt to have it on longer! 

I don't like this soup too chunky, so I take my hand mixer and give it a good go until it is simply the consistency I want. You can leave it chunky or put it in your blender if you don't have a hand blender. Your choice completely! 

About 30 minutes before serving melt your butter in a medium sized pan, add chicken broth, and flour keeping your temperature at a MEDIUM heat. You do NOT want to scorch the bottom or BOIL! 


SLOWLY add your pint of half and    half, while constantly whisking.

 Add your salt & pepper to taste, and Parmesan, then continue to whisk on a medium heat until thickened.  Be patient.  You don't want it gravy thick, but thicker than water for certain! 
 As it begins to thicken add a few cups of your soup to the pot.  You need to do this because I promise your half and half will begin to scorch on it's own. Heat, NOT BOIL, and add back to your crock pot.

This is such an easy and great home made soup!  Most of it you cook alone all day, and then it is an easy and quick completion when you get home.  I ate mine with gluten free vegetable crackers; but the boys had big fat grilled cheeses with 5 different cheeses.  

Sarcasm Note: ** These sandwiches are cheddar, American, pepper jack, cream cheese, and Colby grilled... you know...LOW FAT.


Thursday, January 3, 2013

Tomato Avocado and Spinach Salad

Take one ripe avocado and dice.  Combine it with washed baby spinach from the market and add tomatoes


Toss in a few teaspoons of lemon juice.

Add corse salt and cracked pepper and serve.
 For variations, add cheese of choice ,i.e. fresh parmesan, walnuts or almonds