Search This Blog

Wednesday, November 6, 2013

Broccoli and Almond Chicken

 This recipe is healthy, easy, gluten free and really good.  Promise - no sarcasm with that statement!

Here is what you will need: 
3 chicken breasts, 4-6 cups fresh broccoli florets, 1 small bag of sliced almonds, 3 cups dry white or brown rice, 2 tablespoons olive oil, 2 cloves garlic chopped, red pepper flakes to taste, 1 teaspoon dark sesame oil, salt and pepper to taste.  Feeds 4 people

I cut my chicken breasts into strips to get more char on the pieces. It's good to get this going first because it will take the longest. If you don't want to grill it you can cook it however you choose.

Put your water on to boil while the chicken is grilling and flash cook your broccoli.  You don't want it to be soggy and you will 'cook' it again later.  So, once you drop it in the boiling water,  keep it in there for about 30 seconds. (Drain and set aside) Start your rice using the same pot.

Place your almonds evenly on a baking sheet and place in a cool oven.  Start oven to reach 300 degrees and when it reaches that temperature, remove the almonds.  They will be perfectly toasted.

Get your chicken off the grill when it is done and dice.  It can be a little pink as you are going to cook it a little with the other ingredients. Heat your chopped garlic in a pan with olive oil; and when it is tender, add chopped chicken, broccoli and almonds. Drizzle with sesame oil and toss. Then add your seasonings to taste.  The red pepper really adds a great flavor and you would have to use a lot to make it hot.  Serve over rice when heated thoroughly. 
So quick and easy!  Your family is going to love it so much (and you will too) 


In other news, Jennifer Aniston got a bad haircut today.  I can't image her pain.


Tuesday, November 5, 2013

Vitamin C Water (it's that time of the year)

The benefits of Vitamin C are phenomenal

1. Lemons and limes are rich in vitamins, minerals and antioxidants, which may help aid in digestion, respiration and the prevention of cancer. (or so says Lance Armstrong's organization livestrong.com) 

2.  According to Juicing for Health, citrus fruits are somewhat similar to digestive enzymes. Adding them to a warm glass of water can promote better digestion and relieve common symptoms of digestive conditions, such as heartburn, indigestion, gas, bloating, loss of appetite, vomiting and constipation.  
 
Very appropriate since my last post was hot sauce 

4.  The vitamins and nutrients in these citrus fruits may be of benefit in treating symptoms associated with the common cold or flu, including cough and sore throat. 
 
So during the fall I like to keep some citrus water in the fridge because  A.  Lance Armstrong made it through cancer, and  B.  I need to use the spearmint from my garden. (Both fine reasons)
 

One grapefruit, one lemon, one lime and one orange with some mint! 
No gas or flu....SCORE


Home Made Hot Sauce

I love to garden.  Period.  Yet, it is one thing to love a tender plant until it produces it's fruit, and it's an entirely different thing to know what to do with the produce.  I learned that the hard way!  Years ago I planted WAY more than my family could ever eat, and more than my poor neighbors wanted. So, if you want to garden have a plan and the time to prepare what you grow.  Over the years, I have learned what my family loves the most is home made salsa.  I mean, THIS IS TEXAS! We love our hot sauce, hot wings, hot chili and our Tex-Mex food.  My family is no exception.  

This is the amount of hot sauce we will eat until next summer's canning begins!  (the darker is still hot sauce but it is in blue jars) I have a few peach and apple butters left from the summer, but it is mostly HOT SAUCE.  I canned about 75 jars and have given some away, but most of it is in the pantry highly guarded by my boys!  So let's get started on the recipe....You won't see me using "cups", so don't freak out because you cannot mess this up.

Here is what you will need:  5 large and fresh tomatoes or the equivalent of 5 large, 2 bunches of green onions in the bag (you will use the tops and the bottoms), 2 cans of rotel, 2 - 15oz cans of tomato sauce, 5-15 jalapeno peppers based on how hot you want your salsa, 2 T vinegar, 1 T sugar, 1 1/2 t garlic powder, 1 t salt, 1/2 lime, 2 large garlic cloves, and feel free to make it "your own" by adding any spices you like (season salt, paprika, cinlatro ect) This recipe will make about 4-5 pints

Chop ALL your veggies and peppers into BIG chunks because later you are going to put everything in the blender anyway.  I use 5 peppers for a mild sauce, 10 for a medium/hot and 15 for a hot hot sauce! (I use my roasting pan to put everything in before blending because it is the perfect size.)

 
Add ALL the ingredients listed, slightly chopped in the pan. Mix just a little before blending in the blender. (Be sure you use the tops and bottoms of the green onions, it is a MUST)

When limes are our of season, you can place them in the microwave for about 15 seconds and then roll before slicing.  The heat make it juicier.  But if you find you don't have much juice still, add ALL of the lime instead of half.

This picture shows it all together and below is what it looks like blended. 

So when I say blend it, I MEAN BLEND IT!  Liquify that salsa!  Go girl go

When all of the salsa is blended, add it to a big stock pot and cook on a medium low heat until it has cooked down a little.  Stir occasionally and do not cover.  I leave it on the cook top for about 45 minutes.  Sometimes less and sometimes more.  Place it in your well washed ball jars and then in the refrigerator unless you 'can' it.  The salsa should last in the fridge about 4 months. 


There is no sarcasm note today, because this Texas Hot Sauce deserves only respect and adoration!  


Monday, November 4, 2013

Hawaiian Ham Skewers

Oh hey, it's me again with another easy gluten free recipe!  My boys loved this one, but if we are being honest there are not too many things they won't eat. 

I grilled these because we are still having some great nights, even in November, here is Texas; but if you don't want to use the grill you can absolutely broil them in the oven.  Here is what you will need:  skewers, small spiral cut ham, can of pineapples, 3/4 cup brown sugar and brown rice cooked as directed.

(If you follow me at all you know I always say go fresh as often as you can. But in THIS case you CANNOT go with fresh pineapples. Your ham will turn out mushy due to the enzymes in fresh pineapples that break down the meat.) 

Take your brown sugar, spiral  ham and cut it down the middle

Take 3/4 cups of brown sugar and place in a mixing bowl

combine sugar with the pineapple juice from the can

Alternate your ham with pineapples on the skewers and place them on the grill (or under the broiler if you choose)

Baste continually with the brown sugar and juice mixture until the ham is tipped with a brown smoky color

Serve the skewers with brown rice and your choice of veggies or salad.  Baste one more time with sugar and juice before serving to your guests.  This is a great recipe to put together ahead of time if you are in a hurry!


Easy Vegetarian Tacos (and I mean EEEZEEE)

Black Bean and Corn Tacos

These are so simple, easy AND can be gluten free if you use corn tortillas instead of flour.  I'm not inclined to make difficult recipes that are ALSO gluten free as GF is hard enough sometimes!  Using the freshest ingredients is always the best for any recipe; esp this one because the ingredients are few.  I also love this recipe because it will feed 5-6 people easily, but if you have leftovers, it heats up well the following day.  (NO SARCASM in that statement)

Here is what you will need:  1 can of black beans rinsed, 2 ears of corn cut off of the cob, (or 1 can of corn) 3 green onions chopped, 4 tablespoons of your favorite salsa, 2 tablespoons of sour cream, 
 1 tablespoon of butter and salt and pepper to taste.  Also, corn or flour tortillas.  You can garnish with additional salsa, cheese of your choice, lettuce, tomato, and avocado


rinse your beans

melt butter in your skillet over a medium heat

place remaining ingredients in your pan on a medium heat

add salt and pepper to taste
when everything is well combined and bubbly it is ready to serve! I added cheddar cheese and avocado to mine but other family members added lettuce, tomatoes, sour cream, salsa ect.  I served with chips and it was GREAT!


Here is a fabulous tip:  (you're welcome) if you will put your tortillas in the oven on broil until they are golden, over the rack as shown,  they will hold the taco shape when you are ready to serve. It will work with corn or flour.  


I used this on my 17 year old today when helping him with a Canterbury Tales paper, turned out to be true!  (AGAIN)

Tuesday, October 15, 2013

Canned Apple Butter (Promise it's easy)

So, let me just say I grew up with a Nana who gardened, canned and made me help.  The cousins snapped many peas and beans, cut, and peeled lot of fruit.  I was the only grandchild who lived in town with Nana.  So I was able to watch much of the canning.  It was a CHORE for her, but I loved spending time in her kitchen. When Clint and I bought this home, we actually had room for our own garden.  Clint's  grandfather was a farmer in Mississippi so we were destined to go back to our roots.  (no pun intended)  

With our little garden I have been able to put up some great things.   For summer after summer I TRADITIONALLY canned like Nana.  Boiling jars, preparing contents, and bringing back to another boil to seal when cooled.  But I did some research and found that you can clean your Ball Jars, and lids in the dishwasher with a high wash, rinse and heat dry. One busy day after I did this, I put the contents inside the hot jars, just out of the dishwasher, and put the lids on good and tight.  BUT WAIT!  I had to take a kid to a lesson and did not put them on to boil, cool then seal :(

Yet, I came back they were all sealed.  I tried it with beans, it worked.  I tried it with hot sauce, it worked.  I tried it with jelly, it still worked.  Now, I don't know if it's our altitude or what?  Lubbock is at 3202 ft above sea level and we have a very dry climate.  Does that have anything to do with it?  I HAVE NO IDEA!  But wherever you are I think this method is worth a try!!!  


So here it is:  (FINALLY)  How you can apple butter!  Or you can do peaches EXACTLY the same way and amounts... Here is what you need:  12 sweet apples, 4 pint ball jars and lids, 1 & 1/2 sticks of unsalted butter, 2 t. vanilla, and 2 t. cinnamon, 1 1/2 cups sugar.


Take a dozen SWEET apples and core, peel and cube.  (I used Honey Crisp) They really cook down so you can count on about 3 apples to make one pint.  Put them in the crock pot for 4 hours on high with 1 &  1/2  sticks of unsalted butter, 2 teaspoons of vanilla, and 2 teaspoons of cinnamon.  Cover. I put my jars in about 1 hour before the apples are finished.


When apples are finished cooking and are tender, add 1 1/2 cups of sugar.  I prefer organic cane but you can use whatever you choose.  White granulated is just fine.  Put them in the blender on high until processed.  While they are still HOT, add them to your HOT jars JUST out of the dishwasher.  Tighten the lids and set aside to cool.  As they cool, you SHOULD hear some popping.  That is the sound of goodness and the sealing of your jars. 


After the jars are cooled, the center of the lids will be drawn down.  If you can press it and they pop down, then your apple/peach butter did not seal. But do not press them until they are completely cooled.   If they did not seal, it's no big deal!  You just have to put it in the refrigerator and not in the pantry.  Remember, a dozen apples will only make 4 pint jars so no great loss if it doesn't work for you.  But I have literally never had them NOT seal.  
Note:  when recipes say apple "butter" or peach "butter"  just know it is not the consistency of butter; it is more like baby food.  Now, I love baby food (not), but this is leaps and bounds above it!
Nona Lacewell
Sorry you didn't have a hot dishwasher Nana!

Tuesday, October 8, 2013

Pesto Pesto Pesto !!!!!

Pestos for paninis or pasta....you choose!

Ok so we went to Italy less than a year ago and when we returned, in the spring, I planted my garden.  But this year I added a great deal of garlic and basil.  Why?  Because I was taught how to make my own pestos and let me tell you, speaking from a culinary stance, it changed the way I eat and the way I cook.  

You cannot be worried about calories when you are cooking with this glorious, clean, beautiful, tiny dish.  Small amounts of it will add flavor you will not believe!  Add it to a sandwich or cook your favorite pasta and when it's hot toss in a few tablespoons to coat.  Each tablespoon will be about 75 calories only because of the olive oil.  Pesto originated in northern Italy  and they use ingredients known to their region; garlic, basil, and pine nuts topped off with olive oil and shaken vigorously to combine. Any combination you choose is wonderful, so lets talk about what some pestos have in them:  

you basic ingredients will almost always be
garlic, fresh basil, and about a teaspoon of sea salt.  
Other items you may use are
olives, pine nuts, sun dried tomatoes, chili peppers, onion and of course olive oil. 

Here is what I made today:  

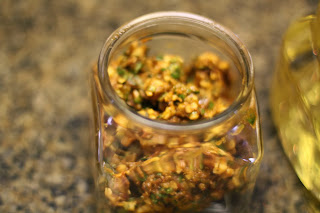
I used 2 cloves of garlic, a hand full of basil, 1/4 up of sun dried tomatoes, 1/5 cup of pine nuts

I know you can put it in a food processor or chopper, but it is recommended by Italian chefs to chop it by hand

When complete with chopping add it to a jar with a lid, cover with extra virgin olive oil and shake

As always on my blog I say, cook to YOUR TASTE.  If you like more garlic add it, if you like less basil, don't use it.

Add I teaspoon of sea salt and shake one more time

Refrigerate and enjoy when needed! 
This is a picture I took from a market in Florence and below is a beautiful pasta display in a window in San Gimignano
  
Ahhh Italhy...I can't even be sarcastic about it